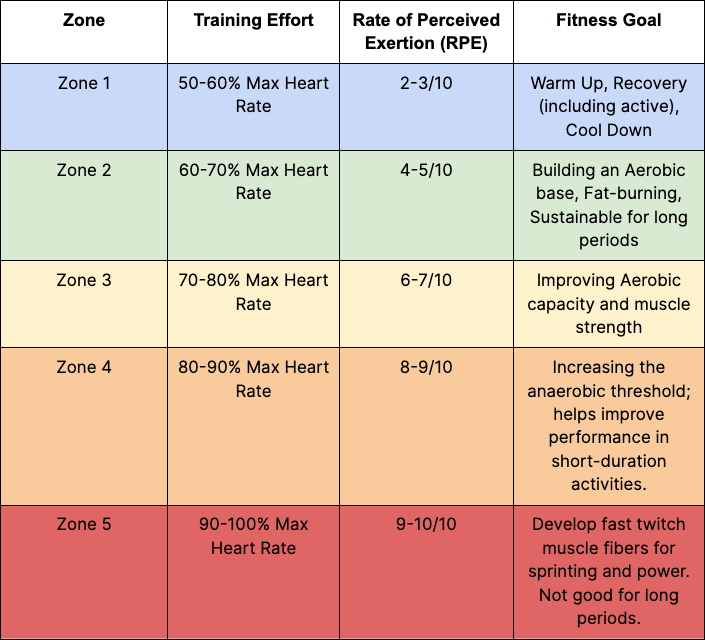
How to Use the Running Zones:
Each zone has a unique purpose, and knowing when to train in each one will optimize your performance and recovery.
Zone 1: Recovery (50-60% MHR)
Purpose: Active recovery, improving circulation, and reducing fatigue.
How It Feels: Very easy effort, conversational pace, low heart rate.
Zone 2: Aerobic Base (60-70% MHR)
Purpose: Builds endurance, strengthens the heart, and improves fat utilization for fuel.
How It Feels: Comfortable, sustainable pace—breathing is steady and controlled.
Zone 3: Tempo (70-80% MHR)
Purpose: Improves lactate threshold, helping you sustain harder efforts longer.
How It Feels: Moderate-hard, breathing is deeper but still manageable.
Zone 4: Anaerobic (80-90% MHR)
Purpose: Increases speed, power, and the body’s ability to tolerate lactic acid buildup.
How It Feels: Hard effort—talking becomes difficult, and breathing is heavy.
Zone 5: Max Effort (90-100% MHR)
Purpose: Trains explosive speed, maximum effort, and fast-twitch muscle fibers.
How It Feels: All-out sprinting—breathing is labored, and effort is unsustainable for long periods.
How to Apply This Chart to Your Training
Use Zone 2 for building endurance and aerobic capacity.
Use Zone 3 for improving race pace and lactate threshold.
Use Zones 4-5 for speed development and high-intensity efforts.
Mix in Zone 1 runs for active recovery to prevent overtraining.
By structuring your runs around these zones, you can train smarter, not just harder—ensuring steady progress while avoiding burnout.

